FAQs

Often, we are asked questions about your specific repair situations where the answers actually provide invaluable advice for others. We would like to share these comments, questions and answers with other customers on our website FAQ page. Please note: we will post a question and its answer both here and Facebook (no personal information will be included); in return we thank you for your insights. If you have really cool pictures we will post them on Instagram, or you can share them. #plastermagic, #bigwallysplastermagic, #PlasterMagic Official

Why should I use Plaster Magic®?

Plaster Magic® provides structural reinforcement for your plaster walls and ceilings. Plaster repair consists of two distinct tasks, stabilization and cosmetics. Until the plaster is structural stabilized by reattaching it to the lath no repair will last. Once stabilized any cosmetic treatment will last.
The most important aspect of plaster repair is to stabilize your existing plaster first-before filling in holes and cracks. As long as the plaster is still in place, it can be stabilized and repaired. For those who are thinking of having another person do the repairs, I offer a few words of caution: beware of those who may suggest removal and replacement with drywall or modern veneer plaster. This is not a remove and replace or resurface method. Plaster Magic® takes half the time and half the money of remove and replace or resurface. Remember-you cannot replace your original plaster with anything as good.

Will Plaster Magic® work on ceilings as well as walls?

Yes! The same set of instructions is used for ceilings as for walls. In our larger kits we include a plastic syringe to help inject the conditioner in the ceiling. Tom Silva demonstrated how to use Plaster Magic® on Ask This Old House, the concept is simple and the product easy to use and it is the only product that fixes what’s wrong with the plaster.

will Plaster Magic® work on stucco?

YES. Plaster Magic® will work on stucco. With this adhesive system you can attach stucco or plaster to wood, wood lath, brick, terracotta or cement block. It works with any cementitious material and wood. If you’re re-attaching stucco to a masonry substrate, you will need to use a different bracing system, for example 2×4’s and boards or sheets of plywood.

Can I get more plastic clamps?

YES. The Accessory Pack is designed just for this purpose; it contains 25 clamps and screws.
I need one or two more tubes of adhesive to finish my project. Can I purchase a smaller quantity?
YES, you can buy individual tubes of adhesive and/or bottles of conditioner. Please call us at 802-254-1330 to order by phone or submit your order on line. We can help you determine the quantity of adhesive and/or conditioner you need to finish your project.

Can I purchase larger amounts of Plaster Magic® for my projects?

You can purchase whatever quantities you need. If you purchase two Contractors Packs at once we will give you free shipping. For making up your own purchase amounts, we recommend a 2 to 1 ratio of adhesive to conditioner. The adhesive is packaged in 10 oz. cartridges, the conditioner comes in 16 oz. and 32 oz. spray bottles and one gallon containers.

If you purchase the conditioner in one gallon containers, we suggest using a high quality garden sprayer to spray it into the holes (this is what we use on big jobs). Please give us a call to discuss your project, we can help you calculate how much adhesive, conditioner and clamps you’ll need.

Is your product available in retail stores in my area?

We would love to sell our product in paint, hardware and home improvement stores in your area. At this time we are endeavoring to make this a reality.

We do have a wholesale program set up for retailers interested in selling Plaster Magic® adhesive repair kits. One of the best ways to get this into your neighborhood store is to talk us up. We encourage you to show the store manager our product, let them know we can supply any quantity of Plaster Magic® and suggest that their representative contact us at 802-254-1330. Buyers are driven by their customer’s needs. Thank you for your support!

Please check out the stores that do carry the Plaster Magic® line, here. (Stores page)

I have a lot of loose plaster and I’m trying to repair it. I can’t afford your tools and products, can I substitute adhesive caulk?

You’ve brought up a great question. And the answer is why we developed Plaster Magic®. Professional solutions are not always readily available to the homeowner/consumer. And the main reason may be because they’re more costly to produce since they’re professional grade (for example: we use pure, high-quality water borne components and with no inexpensive fillers or bulking agents). I guess you might say – you get what you pay for. Regardless, using Plaster Magic® will save half the time and money (as DIY) and last longer than any other repair method. You can use an adhesive caulk (I’ve known people to use denture grip), but they will fail due to them not being designed for the plaster repair application. You’re actually comparing apples and oranges; adhesive caulk and Plaster Magic® are very different.
You can’t take an item designed for one purpose and apply it to another without some kind of failure.

Our adhesive system has been specially formulated to overcome the dry and dirty surface conditions inside walls and ceilings; whereas other adhesives will not accommodate this situation. I’ve been using this adhesive for 30 years in my plaster restoration business with great success.

How much should I buy?

It’s important to understand the condition of your plaster prior to purchase. The basic formula is one cartridge of adhesive for 3 feet of loose crack. It’s important that there be space between the plaster and lath for the conditioner and adhesive to go. Here’s a low tech method to measure that space (Paperclip story) If there is no space between the plaster and lath the adhesive will come back the hole, really fast. You won’t dodge it, so wear old clothes.

Do I need plaster too?

The Plaster Magic® Patching Plaster we sell is designed for holes down to the lath. This isn’t a resurfacing plaster. It’s structural and meant to replace the basecoat in your hole patch. I designed this patching plaster specifically for maximum compatibility patching next to historic plaster. We sell a small pail for $19.00 that covers 250 sq. inches and a larger pail for $29.00 for covers 500 sq. inches. Plaster Magic® Patching Plaster can be finished out with ready-mix joint compound and is designed specifically for compatibility with the plaster in older homes.

How long can I keep the product?

Our policy states that up to a year we will replace any defective material that has been stored properly. That means 60-70ºF, cool and dry. That being said I’ve used both conditioner and adhesive that was between two and three years old that worked great.

How do you know if your stored material is still good?

It’s easy to tell if your conditioner and adhesive is still good. When the conditioner goes bad it separates into white solids and a sometimes yellowish or clearish liquid. When the adhesive goes bad it solidifies to some degree, often as a cottage cheese-like material that doesn’t come out the cartridge easily.
The conditioner and adhesive go bad, usually from being stored improperly (read hot, damp, or too cold).

Do I have to worry about freezing temperatures?

We designed Plaster Magic® Conditioner and Plaster Magic® Adhesive to withstand below freezing temperatures during shipping. Occasionally the material goes bad (See above) from too many freeze thaw cycles. If this occurs, we will happily replace the damaged material. All we ask is that you return the unused material so we can determine why it spoiled.

Do I open up the cracks?

Don’t open up the cracks! When you “V” out the cracks you’re causing unnecessary damage and making extra work for yourself while accomplishing nothing good. Opening up the cracks cuts the fiber in the plaster actually weakening the plaster. Additionally, there is nothing you can put in the opened crack that will prevent the crack from reappearing. You can put joint tape over the filled crack so the crack isn’t seen, but it’s still there. Plus you’ve created lots of work for yourself with no positive results.

Do I need to put tape over the cracks?

No you don’t! Using the Plaster Magic® system reattaches the plaster to the lath on either side of the crack, reinforcing it subsurface. There is NOTHING you can apply to the surface (which depends on the paint layer to hold it together) that will hold it anywhere near as good. You’re using wood, 1 ¼ inch wide by 3/8 inch thick to bridge the crack. Like to see paper tape match that…Tape on the crack just hides it.

I seem to use a lot of adhesive. Is there any way to mitigate that use?

The simplest way to cut down on the adhesive waste is to cover the tip when it’s not in use.
Let me explain in more detail…When the adhesive is packaged into the cartridges, they are filled under pressure, not much, but some pressure.

The Plaster Magic® Adhesive, not being a caulk and having a thinner viscosity, will start to come out when the tip is cut off. So, you have the supplied gloves on, the holes drilled, the conditioner sprayed or injected in the holes, and you’re ready to inject the adhesive. Don’t cut the tip off until you’re ready to inject the adhesive. Cut the tip and slide your finger over the cut end of the cartridge to keep the adhesive from leaking out. As the tip approaches the injection hole slide your finger away from the cartridge tip and seat it in the hole to begin injecting the adhesive. You need no more than one complete squeeze of the trigger, sometimes less, then release the pressure with the thumb latch or rotate the plunger rod. Then as the tip comes out of the wall, slide your finger over the tip to prevent any more leakage…IF YOU NEED TO RESEAL THE CARTRIDGE USE A LARGE RED WIRE NUT AND SCREW IT OVER THE TIP, TIGHTLY.
IMPORTANT: Make sure there is room in between the plaster and lath. Paperclip story, how to determine the space between the plaster and lath.

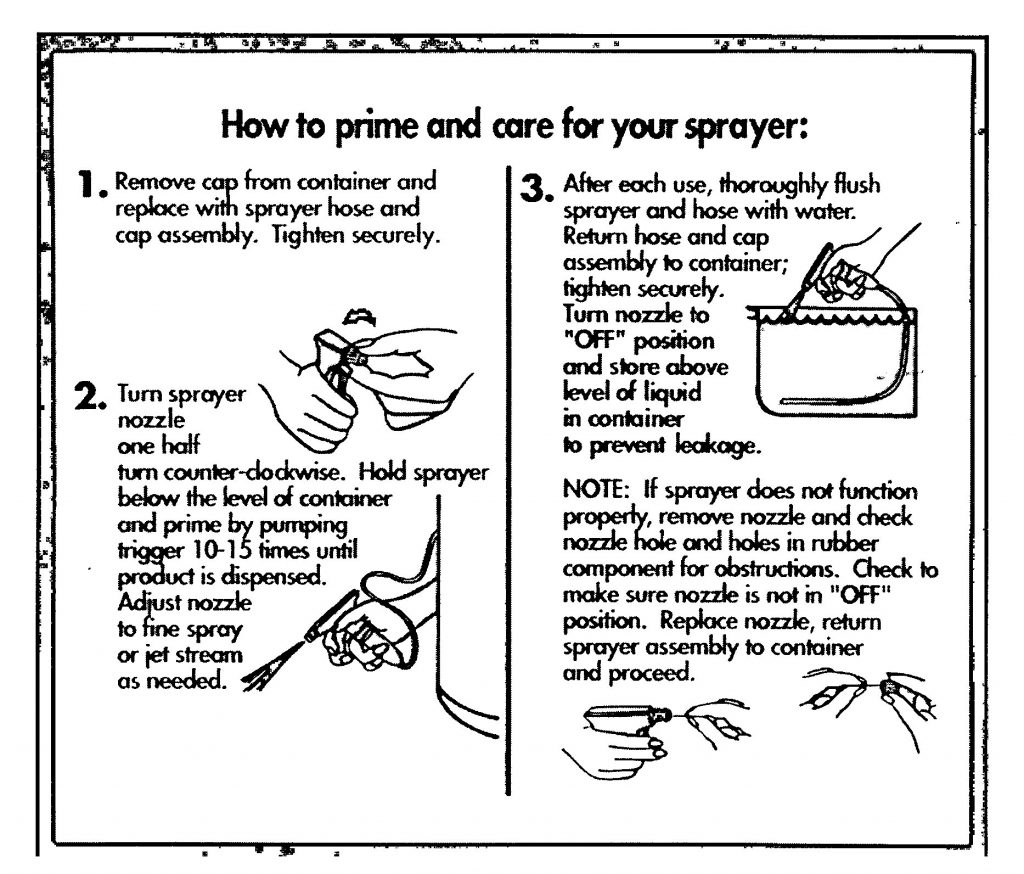
How to Prime and Clean your Sprayer