This post is part 3 of a 3-post series.
Whenever you approach a plaster repair project, there are three crucial issues to keep in mind:
- The Building
- Beauty and Durability
- Stability
Last week we addressed issue #2, Beauty and Durability. This week we’ll discuss issue #3, Stability.
Homeowners often get frustrated when repairing historic plaster because the same crack they fixed shows up again in a few years. “What happened?” they say. “I just repaired that wall!”
Think Deep.
 When surveying damaged or cracked plaster, it’s important to think beyond the painted surface. True, the surface is the only thing you’ll end up seeing. But it is crucial to give your finished plaster surface a stable underlayment, lath system and frame. This will ensure that it lasts decades, possibly centuries. You wouldn’t put a new roof on your house if the rafters underneath were rotted away, right?
Aside from moisture damage, most plaster wall and plaster ceiling damage is a result of a moving building. This can occur as a result of:
- Earthquake
- Severe Weather
- Sinking Foundation
- Home repairs that necessitate structural modification
- Rotting wood
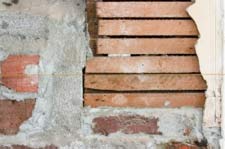
A plaster wall is basically a sheet of thin rock. That thin sheet is attached to wood lath (thin strips of wood attached horizontally to studs). The lath is attached to the building’s structural system (typically vertical wood studs). That structural system bears the brunt of any movement in a building, which in turn weakens the plaster/lath relationship and breaks them apart. You’re left with loose plaster that is no longer attached to its host.
You’ve got broken plaster. Now what?
If your building’s movement was caused by a sinking foundation or rotting wood, you’ll want to address that problem first. There’s no use spending the time and energy to repair plaster cracks only to have it reappear in a few years.
Once you’ve assured a stable structure, you’ll want to perform subsurface reinforcement, which is basically a fancy way of saying “glue it back on.” After drilling small holes around the broken plaster, use a specially-designed plaster adhesive to reattach it to the lath behind. This adhesive is designed to bond the “rock” and “wood” back together, creating the relationship that was lost during the building’s movement.
Okay, NOW you can get to the fun part, the part everyone sees and where your hard work pays off. Your plaster is now stabilized and you can perform the surface cosmetic tasks to produce a smooth, beautiful surface.
Like anything in life, it pays to get to the root of the problem. Good luck and happy plastering!