 Our plaster repair tip for today is coming straight from a new customer.
It’s funny… we’ve been working with Plaster Magic® for so long, we think we know everything there is to know. That’s why it’s so great to hear from new users with innovative tips and tricks to make plaster ceiling repair even easier (or in this case, a whole lot less messy). We would have never thought of this one…
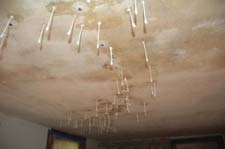
Have a look at that photo. No, those aren’t stalactites hanging inside a cave. They’re Q-tips. A new homeowner from Cape Cod discovered that these cotton-coated sticks are not only useful for keeping your ears clean, they’re perfect for keeping your floors and work area clean while making plaster ceiling repairs.
When spraying the liquid Plaster Magic® Conditioner behind broken plaster on a ceiling, 10 times out of 10 you’ll get some residual drippage. Our homeowner discovered that if you stick a Q-Tip in the hole immediately after spraying in the adhesive, you’ll minimize that drippage to practically nothing. Coincidentally, the Q-Tip is a perfect fit for the 3/16″ bit we recommend for drilling.
After spraying adhesive into each hole, our homeowner went back and removed each Q-Tip, one by one, and injected Plaster Magic® Adhesive, replacing them as he moved from one hole to the next. When it was time to screw the clamp through the plaster and into the lath, the Q-Tips worked beautifully, forcing all the excess adhesive to squirt sideways, behind the plaster, instead of squirting out of the hole and onto your floor.
So here are those steps again…
- Drill 3/16″ holes as usual to prepare broken plaster for the Plaster Magic® Conditioner and Adhesive.
- Spray conditioner into each hole, one at a time, and immediately plug the hole with a single Q-Tip.
- After conditioning each hole, start at the beginning and remove each Q-Tip, one at a time, and inject adhesive, replacing the Q-Tips as you go.
- Screw in clamps.
- Remove Q-Tips and wipe excess adhesive with damp sponge or cloth.
- Have a drink. With all the cleanup time you saved, you deserve one.
If you have any tips for using Plaster Magic®, please let us know. We love hearing from you and so do our other customers.